Be careful : the following
explanations are for the old windows-only version. Major features are
also common to the new java version, but you can find few differences
here or there. Particularly, the stereo-morphing is specifique to the
old windows version. The new Java version offers a new experimental
tool : see 2D->3D->Stereo Sculptor
To see depth each eye needs a different image, corresponding to the
shifted position of the eyes at the time of observation ( about 6
cm) An anaglyph is an image obtained by the
superposition of these 2 images in complementary colors, for example
Red and Cyan. By looking at this image with a Red/Cyan glasses,
the left eye sees the Red image (original left), while the right eye
sees the Cyan (original right) image. The brain recomposes the
full colors and gives the impression to see an image having all the
colors the originals... and with depht !
That goes very well for all the colors which are not too close to the
Red or the Cyan. Because if not, there is only one eye which sees
the part of the image of this color : a bush of roses with red flowers
does not look very well in Anaglyph. In this case, the automatic
function of desaturation of reds and cyans of AnaBuilder will enable
you to correct the colours so as to make the Anaglyph observable : the
flowers will not be red any more, but they will be visible in the
colour of your choice (violets, yellows, black.. pink?).
It should not be forgotten that 3D photography, is above all
photography. So, AnaBuilder integrates some basic functions which
will enable you to improve the quality of the result. Some of
these functions have a direct influence on the quality of the 3D
perception (as the filter of vertical edges improvement), others make
it possible to catch up with certain errors made during photoshooting :
luminosity, colors, etc...
Learn to use them sparingly, because nothing will replace good shots.
If one does not have a camera with 2 objectives, it is only possible to
photograph motionless subjects. Even a minimal displacement of
the subject completely distorts the 3D result. But with a camera with 2
objectives, it is possible to shoot in 3D all the drops in suspension
of a fountain (splendid!).
Photographs
Take 2 shifted photographs :
The camera must be moved horizontally, from left to right,
without rotation, advancing or back move.
The shift can be of 3 or 4 cm for a close object, and 7 or 8 cm
for a landscape with near objetcs, and more for a far landscape.
At the beginning, there is always tendency to shift too much. In
my tests, I note that with a weak shift the result is always correct in
Anaglyph, but if the shift is too important, the Anaglyph is not really
observable any more . I read rules of the kind : it is possible to
shift until 1/100th or 1/30th of the distance between the camera and
the nearest object in the scene. It's up to you to test..
It is possible to refocus slightly on a near isolated object, but
make sure that there are no eyecatching distant objects. Best is
to leave the apparatus in the same frontal direction, well parallel to
the scene (somebody proposes to use a roller skate).
The ideal is to have a camera (numeric) that can take photographs in
burst. It should be used without flash to avoid having to wait
during recharging. Launch the catch in burst and move the
apparatus from left to right to make a series. Take a stronger
sensitivity (or numerical equivalent) to avoid blurring. AnaBuilder
then makes it possible to test in a very flexible way the combinations
of photographs, to find the best suited pair.
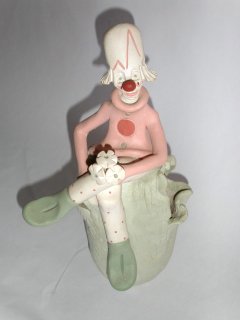
Important : if a picture is taken with a flash on the camera, the shade
moves with its position, and will not caught in 3D. It is the
case of my clown, but I did not know it when I took the pictures. Note
the displacement of the shade of the flowers on the hip.
Example :
Left
Right
First assembly
Launch AnaBuilder :
Load the left image, then the right. The composit Red/Cyan image should
appear. Resize the window to have the good proportion. The larger
the image, the easier precise retouching, but more time will be spend
during processing of the changes. It is possible to adapt the width
and/or height of the image to allow easier correcting.
To optain optimal depth, the 2 images must overlap as complete as
possible.
Horizontal and vertical fitting
Choose an object of the image, about in the center of the image, which
will have to appear at the depth of the screen in the 3D image (neither
in front, nor behind). This reference object will be used during
the whole assembly process.
Example : the large button of the sweater of the clown.
Click on the image with the left button of the mouse. Keeping the
button pressed, shift the Cyan image to superimpose the reference
object as good as possible :
Click on "Diff" at the top left. The difference image can be used to
finetune the shifting process. All well fitted parts of the image
become black, and the shifted are colored.But keep in mind that, as the
images are different, coloured zones will appear inevitably: some are
due to a bad fit, and others due to the 3d (perspective) shift.
Use the buttons on the left side, to make the reference object as black
as possible. You can alternatively pass from the color image to the
difference image to refine the result.
Rotational fitting
An object seen the 2 images (left,right) can show horizontal shift
between its red and cyan components depending on its position relative
to the reference object which has just been adjusted. but they
should not present vertical shifts !!. Therefore horizontal edges
of objects should not show color( red/cyan) shifts:
On the color image, there should not appear Red or Cyan shift on
horizontal edges.
On the difference image, horizontal edges must disappear to
become completely black.
Locate a horizontal edge on the right of the image and an other on the
left of the image to locate a possible rotation defect. Use the
rotation buttons on the left to eliminate the rotation defects. If
need, refit the image horizontally or vertically as explained before
(using the reference object).
Expansion Adjustment fit
Find an horizontal edge on the top of the image, and one other on the
bottom, to find a possible size defect. As for the rotational fitting,
use the enlargement and contraction buttons to eliminate the
homothety defects. If required, refit the image horizontally or
vertically as previously, using the the reference object (or any other
one if that is easier).
Finalisation
Put the Red/Cyan glasses on. When the fitting is successful, the image
should seem to exist in space, and the presence of the 2d screen should
not be noted. Do not forget that it is best to look at the image in its
original proportions so, save the image en reopen it fullscreen in a
dedecated imageviewer program.
For a good appreciation, wait a few seconds so that your eyes get
accustomed to the anaglyph.
The larger the distance to the screen, the easier for the eyes to focus
and to deduce the depth. Therefore, if initially you find it hard to
see the depth, move away from the screen to 2 or 3 m, and gradually get
closer again.
It is possible to accentuate the position of objects behind the screen
by moving the Cyan image to the left. On the other hand, it is possible
to accentuate the position of objects in front by moving the Cyan image
to the right. If the rotation and dilatation fits are successful, the
eyes accept a rather important left/right displacement. If not, the
observation quickly becomes unpleasant, and the image loses of its
depth.
You can make an object 'jump' out of the screen, by shifting the cyan
part of the image but care should be taken not to let object touch the
border of the screen. The eye locates very well the borders of the
image at the distance corresponding to the screen. The interaction of
an object thought to be in front of the screen with the border of the
image breaks completely the depth impression. This is true for the top
and bottom borders, but that is even more for the left and right
borders. To have an object on the front of the screen, one needs an
important left/right shift between the 2 images. Because of this shift,
one of the 2 images finishes inevitably earlier on the border than the
other. There is thus a piece of image which will be seen only by one
eye, which breaks the stereoscopic effect.
Color Filtres
Luminosity : value between -255 and +255, the value with no
effect is 0
For a positive value: this filter shifts all colors in the same way to
the white. The palest colors are saturated to the white. The blacks
become grays.
For a negative value : this filter shifts all colors in the same way to
the black. The darkest colors are saturated to the black. The whites
become grays.
Contrast : value between 0 and +255, the value with no effect
is 1
For a value > 1 : this filter dilates the color histogram from the
center to the extremities. The palest colors are saturated to the
white. The darkest colors are saturated to the black.
For a value < 1 : this filter compresses the color histogram from
the extremities to the center. The whites become grays. The blacks
become grays.
Gamma : values between 0 and +255, the value with no effect is
1 (an increment corrects the global value for each RGB component)
For a value > 1 : this filter shifts all colors to the white. The
whites and blacks are preserved.
For a value < 1 : this filter shifts all colors to the black. The
whites and blacks are preserved.
White balance : values between 0 and +255, the values with no
effect are +255
The 3 RGB components are rescaled to set the white color to the
indicated value. The blacks stay blacks. The colors paler than the one
indicated become white.
L/R exposure correction : values between 0 and +255, the value
with no effect is 1
The 3 RGB components of the right image are rescaled in order to make
the global luminosity identical to the left image. The blacks are
preserved. The palest colors become either whiter or darker, according
to the sense of the correction. The "auto" button calculates this value.
If the two views are not of the same luminosity, it gives a red shift,
and on the contrary a cyan shift :
The left view is darker. The anaglyph shifts to
cyan.
The left view is less dark. The anaglyph shifts to
red.
Shift R/G at right :
This transformation changes reds to yellows in the right image to avoid
flashing on the anaglyph. This transformation is not always possible,
for esthetics reasons, but may produce good results in certain cases.
See for example the images produced by Didier Leboutte using this
technique for his aeroplanes
and helicopters .