The explaination from Frans Van de Poel to chase ghosts.
It may happen that in your scene there are objects with colors very close to the pure red or the pure cyan. In this case, one of the 2 eyes sees the color, and the other sees black. This produces a very unpleasant flashing effect. To correct that, AnaBuilder uses a tunable technique to rebalance the colors. To use it, it is necessary to quickly explain how it works:
for each point, the software estimates the contribution of the red to the luminosity.
if this contribution exceeds a threshold, the red is gradually reduced to be added to the green and blue components.
if this contribution goes below another threshold, the green and blue are gradually reduced to be added to the red.
The default settings result in a constant luminosity, and equal treatment of the green and blue parts. I adjusted them at my best. By modifying them, one can obtain a result either more luminous, or darker, or more red, or more blue, or more green, etc.
The following principles are always true:
in a band of "balanced" hues determined by the two thresholds, all colors remain unchanged.
outside of this band, the filter action is progressive (linear) so as to preserve the color nuances.
Click on the check box "desat". The parameters window of the desaturation filter appears.
The first parameter can take any value. It is used to make the 2 thresholds symmetrical.
The 2 thresholds are in theory between 0 and 1.
The contributions of rebalancing can take any values and are to be thought "for 1".
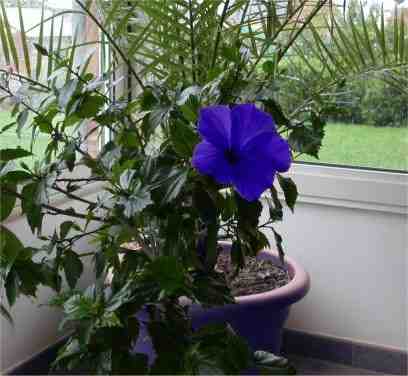
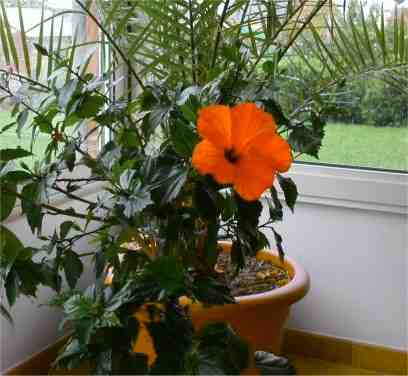
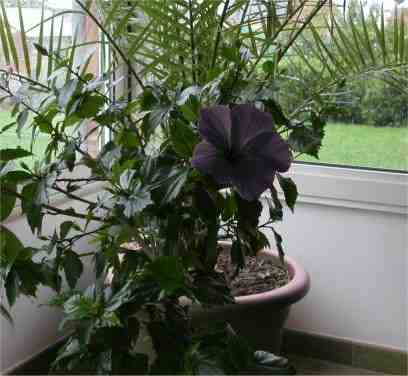
While tuning the parameters of rebalancing you can obtain almost any color starting from the color which causes the problem. Find below an example of possible variations. The colors are voluntarily exaggerated, and also illustrate the kind of somewhat undesirable consequences one can obtain (see the pot and the tiling). I insist on the fact that these images were realized without other intervention than the desaturation fonction !
(Original image) (With the default settings)
Psychopathic variations:
Some concepts for the use of the matrix filters
For the mathematicians among us: it acts as a convolution between the image and the matrix.
I suppose that all the image softwares that processing with a higher level than "luminosity - contrast" use these filters. Except that the user sees only one simple panel with some explicit cursors of adjustment instead of a strange matrix.
The principle is as follows:
The filter recomputes the value of each pixel according to its neighbors. The matrix explains how each neighbor is taken into account. The recomputed pixel is in the center of the matrix, for this reason the number of lines, or columns must be odd (or else it becomes less easy to understand).
Let us take a simple case: a matrix of one line and three columns:
1 1 1
The value of the recomputed pixel (in the center) is equal to:
the right pixel + the center pixel itself + the left pixel
The result: one makes a horizontal blur by spreading out the colors. Like this, this matrix multiplies the total luminosity by 3, since one adds 3 times the image with itself.
To avoid that, one normalizes, so that the total sum of the values equals 1 (the program does that by itself):
0.33 0.33 0.33
The value of the recomputed pixel is equal to:
0.33 * the right pixel +0.33 * the center pixel itself + 0.33 * the left pixel
If you want a less blurres effect, it is necessary to lower the left and right values, and to increase the central value. Like that, the recomputed pixel is less modified :
0.1 0.8 0.1
The value of the recomputed pixel is equal to:
1/10 * the right pixel + 8/10 * the center pixel itself + 1/10 * the left pixel
Then, all is a question of math formulas, but one can test to see.
The following filter calculates a second horizontal derivative, therefore "strongly reacts" on the horizontal variations. It is used to reinforce the vertical edges:
-0.5 2 -0.5
The maximum intensity of the filter is obtained by lowering the central value to obtain an nearly null sum before normalization (and in the limit case one cannot normalize any more), for example:
-0.50 1.01 -0.50
It is hard to obtain a complex result with only one filter. For this reason AnaBuilder gives the possibility to chain several filters.
For example, if there is a very noisy image, it is possible to eliminate a good part of the noise by chaining 2 filters: a filter of smoothing, and a filter of sharpening. The filter of smoothing spreads out the colors so that the variations due to the noise are compensated between a pixel and its neighbors. But, this operation gives a blur. The 2nd filter sharpens the edges to eliminate this blur:
Here are another two examples. The first is obtained with 2 filters, and the second is obtained with only one filter:
Saving
Before saving the image AnaBuilder recomputes the image in its original dimensions, and trims the borders by cutting off defects caused by rotations or dilations. This can take some time.
Here the result which I obtained starting from the 2 images given at the beginning: