Basic concepts
The stereo-morphing makes it possible either to convert a 2d image into
a 3d image, or to change the depth of an existing 3d image. To work on
a 2d image, it is sufficient to load 2 times the same image: once as
the left image, and as the right image.
When the tool is open
(by clicking on the box "morph") the loaded image is shown on a grid.
This grid makes it possible to define the deformations to be applied to
each of the 2 images left and right to change the depth of each point
of the image:
- position the cursor on the image: the zone to be modified appears in bold.
- modify the grid with the mousewheel, or with the arrow keys on the keybboard.
- the modifications of depth are displayed in a window on top and on the right of the image.
- click on "morph" in the menu to calculate the transformation of the original image.
By
default, AnaBuilder applies the deformations to a square of 5x5 grid
boxes, constant to all the points of the square. It is possible to vary
at the same time the dimension of the rectangle and the way in which
the deformation is applied horizontally and vertically.
The "linear" option makes it possible to produce a deformation of depth
in a triangle. This triangle can be nonsymmetrical if the values
left/right and up/down defining the rectangle are not equal.
The "Gaussian" option makes it possible to produce a deformation in
bump form. This bump can be nonsymmetrical if the values left/right and
up/down defining the rectangle are not equal.
It is possible (and even recommended) to apply a deformation which is different vertically and horizontally.
One limits the zone of deformation by describing a selection with the
left button of the mouse surrounding the desired zone. When the
rectangle of deformation is larger than the selected zone, the
deformation is applied only to the selection. This selection can be
reversed to work on the contrary on the remainder of the image without
touching the surrounded contents.
By adapting the selection,
the range of the transformation can be controlled by adjustment of the
left/right and up/down limits allowing a fine definition of the wanted
depth.
Caution: when a deformation is applied to a single
point of the grid, AnaBuilder tends to move also the neighbouring
points to avoid overlappings (the morphing would be then more difficult
to calculate). These 'forced' deformations are not easy to undo later.
It is then possible to uniformly bring back the points of the selection
to their zero level, so as to take again their in-depth setting
starting from a clean configuration.
Example of 2d - > 3d convertion
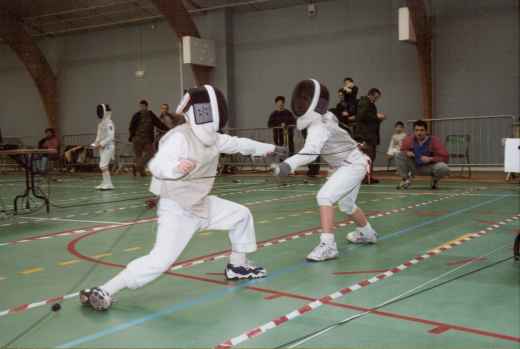
Load the following 2d image on the left and on the right, and click on "morph".
Select with the mouse the 2 fencers, and reverse the selection so as to work on the background without modifying them.
Choose horizontal transformation:
- linear to produce a progressive variation
- 0 on the left
- 100 on the right so that the zone is 2 times larger than the image (all points will be modified)
Choose vertical transformation:
- linear to produce a progressive variation
- 0 on top
- 25 at the bottom so that the zone touches the bottom of the image, with a null deformation on the lower border of the image.
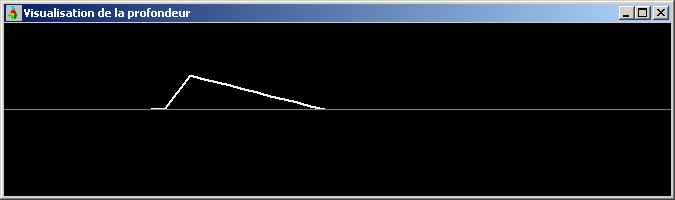
Place
the cursor on the left at half height (on the level of the table).
Press on the downward arrow of the keyboard (or use the wheelmouse)
until a maximum depth is obtaining at semi-range (see visualization) in
the window in top and on the right). You should get following result:
Keep the same parameters, using this time a constant vertical
deformation. Place the cursor in top of the image so that the bottom of
the selection comes just on top of the preceding deformation. Press on
the 'down' arrow on the keyboard (or use the mousewheel) until
obtaining a maximum depth with semi-range (see visualization in the
window in top and on the right) which corresponds exactly with the
depth obtained in the preceding stage. You should get following result:
The floor and the wall at the back are thus in place.
Reverse the selection again, so as to modify the fencers. Click on
"Reset selection" to eliminate the imperfections introduced by the
preceding modifications.
Choose horizontal transformation:
- linear to produce a progressive variation
- 50 to have a width more important on the left than that of the fencers
- 0 to the right
Choose vertical transformation:
- constant
- 0 on top
- 40 below to cover the height of the fencers
Place
the cursor on top of the right of the 2 fencers. Press the 'down' arrow
of the keyboard (or use the mousewhell) until obtaining a depth which
as good as possible adjusts the vertical lines which cover the fencers
in accordance with the vertical lines which run towards the bottom. If
these lines are well aligned, the fencers will be well in their place,
with the good depth. You must appoximately obtain the following
configuration:
The main part of the job is finished. Click on "morph", then remove the
grid by stripping the options of left and right boxes. Click on the
left button of the mouse anywhere in the window to remove the zone of
selection. Admire the result:
Enable the grid again, or left/right only. Eventually show only one of
the two sights left/right to better see the deformations. Set a
rectangular transformation of 0x0 so as to move only one intersection
of the grid at the same time. Correct the small defects of morphing,
while avoiding breaking the great parts.
Via selections You can treat objects of average size: characters in the background, pillars, etc...
Example of vertical correction
It is possible to have vertical shifts even on a otherwise perfect
couple. In addition, if one makes stereoscopy as a tourist (without
stable support) vertical shifts are easilycreated. The foregrounds move
more quickly than the plane backs. Therefore, these shifts are not
homogeneous, and one cannot correct them with a global transformation,
one needs a transformation particular to each object of the image.
It is what one can do by using the stereo-morphing, after having turned the image 90°.
In this example, I introduced voluntarily a vertical shift between the
2 takes of the couple which was used to assemble the anaglyph on the
left. Whereas the background is rather well fixed (I made it quickly),
the foreground presents a more or less important vertical shift
affecting the depth. These shifts completely break the depth of the
flower (in any case, I see it as flat). I made a progressive correction
(also rather quickly), on the anaglyph of right-hand side. This time, I
see the flower very clearly leaving the screen.
Now it's yout turn to play...